When mobile teams grow and projects become more complex, CI build times can also grow. When this happens teams begin to investigate CI optimisations to keep cycle times as short as possible. One of the first strategies teams look at is parallelization.
“Parallelization means running some or all tasks simultaneously, which reduces wall clock time and increases the productivity of a development team.”
At Bitrise, we want to help you save developer hours and cut costs, so we introduced Bitrise Pipelines, which provide an easy way to parallelise your CI tasks.
What are Bitrise Pipelines?
Bitrise Pipelines is the top level of our CI/CD configuration. Pipelines can organize the entire CI/CD process and enable advanced configurations with multiple tasks running in parallel and/or sequentially.
A Pipeline's building blocks are:
- Workflows: A collections of Steps performing some higher-order activity (e.g. running unit tests) on its own VM. Workflows show up as boxes in the Bitrise pipelines UI (below)
- Dependencies: Rules which control whether a workflow can run now or must first wait for upstream workflows to finish. These are represented by the connecting lines in the diagram.

How does it work?
This is best explained using the example above. When the pipeline is triggered, the primary workflow will run on its own. When it finishes, both ui-test and unit-test will run at the same time in parallel. The deploy workflow will execute only when both ui-test and unit-test have finished.
Workflows run in parallel by default. By applying dependencies you can control which parts of the pipeline run should run sequentially.
Fail fast, recover fast
Once your build is running, the pipeline build page shows you the status of every workflow in your pipeline. If any of the workflows failed you can save time by re-running just the failed workflow without needing to re-run the whole Pipeline. You can even re-run the pipeline from any given workflow in the graph if, for example, the workflow immediately preceding the failure is required for a successful re-run.
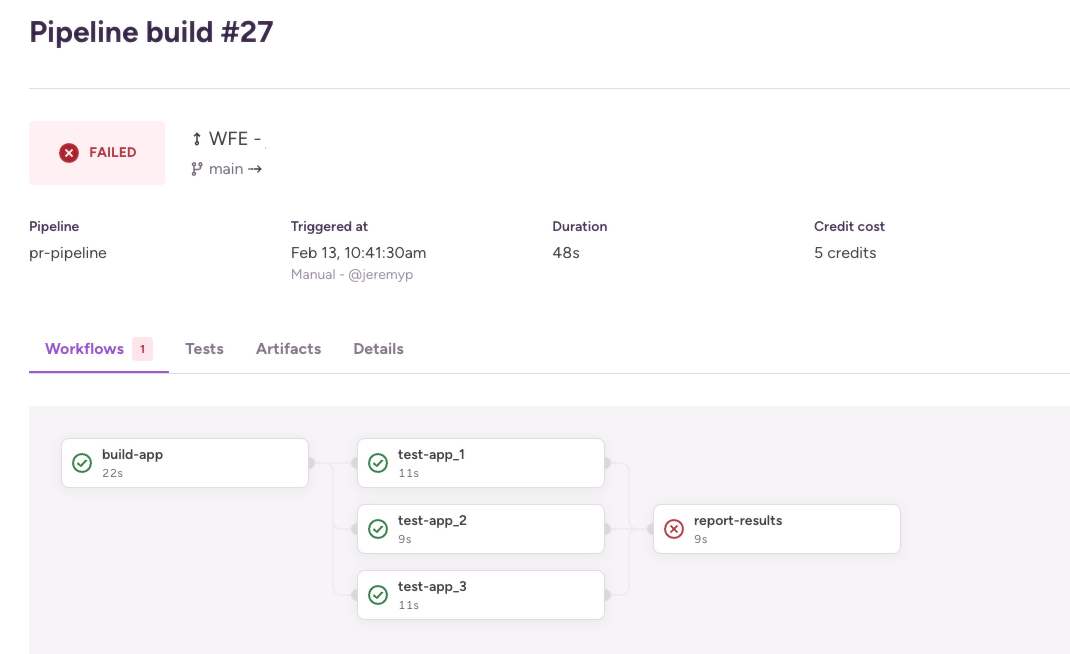
Once a pipeline build has finished all the artifacts generated by each Workflow are collected and you can see them in the artifacts tab.
The benefits of Bitrise Build Pipelines
Faster builds
You can run your builds in parallel and get mobile apps into production quicker. PR checks can be executed faster and more developers can commit changes and run more builds, and they gain the ability to compare sequential builds to ones already parallelized. Moreover, artifacts produced in one Workflow can be reused in the next Workflow resulting in faster CI results, faster builds, and lower credit consumption.
Implement test-sharding
This is where most teams start their parallelisation journey. Large test suites can be split into smaller pieces and run in parallel to save developer time. UI, unit, simulator, and security tests (you name it) can run independently to help you identify where a step is failing faster.
Save time and credits by only re-running failed Workflows
Why wait for a whole workflow to be re-run when you can run part of a workflow and get it done quicker? When a Workflow fails, select to re-run only the Workflow that failed in your Pipeline. Build Pipelines’ partial re-run also makes 3rd party flakiness a non-issue giving you gains in developer productivity, time, and money.
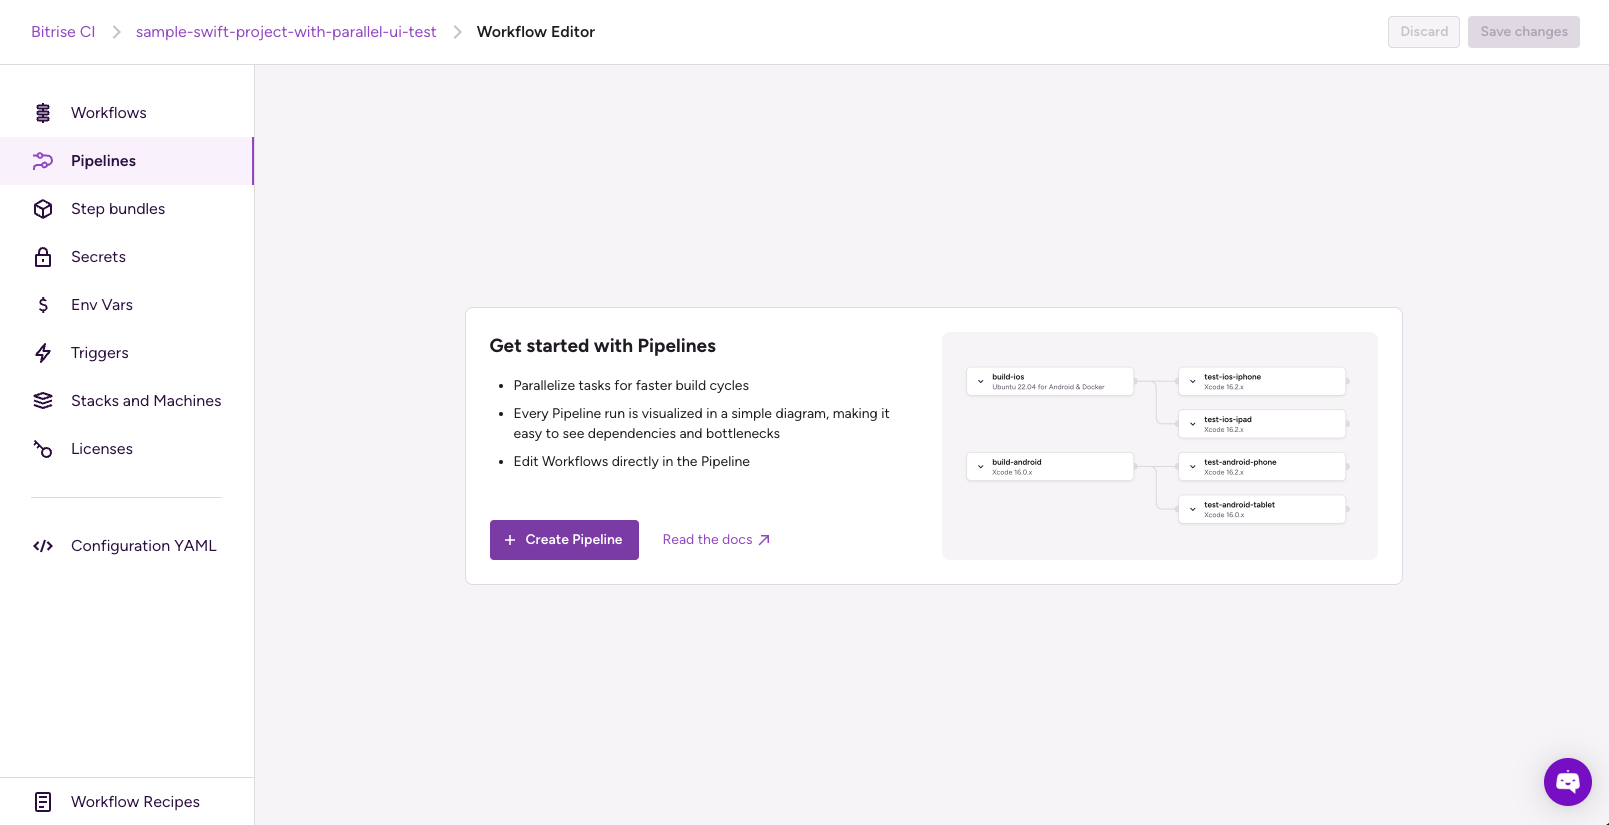
Getting started with Bitrise Pipelines
In our example, we will implement Bitrise Pipelines for an iOS application. When adding an iOS project on Bitrise, it will contain two Workflows by default, primary and deploy. Or, if you already have an existing app, you may already have your own Workflows or Steps which you can use to create a pipeline.
If you don’t have a project to try this out on, don’t worry - you can fork our sample app from here, then watch our BitByte video about adding an iOS application.
Configuring Bitrise Pipelines
You can configure Pipelines in the graphical Workflow Editor or by directly editing the bitrise.yml file.
To create your first Pipeline, follow these steps:
- Open the Bitrise project’s Workflow Editor.
- Go to the Pipelines tab and create a new Pipeline
We will now take a look at an example pipeline. You can use what you learn here to construct your own.
In the example bitrise.yml file below, the run_ui_tests and run_unit_tests Workflows are extended with a deploy-to-bitrise-io Step to make the generated test results available for the next Workflow.
The build_and_run_tests Pipeline is extended with a new Workflow: merge_and_deploy_test_results.
This Workflow runs the deploy-to-bitrise-io Step to upload artifacts:
- pull-intermediate-files Step downloads the previous Workflow (run_ui_tests and run_unit_tests) generated test results.
- script Step moves each test result into a new test run directory within the Test Report add-on deploy dir and creates the related test-info.json file.
- deploy-to-bitrise-io Step deploys the merged test results.
---
format_version: '13'
default_step_lib_source: https://github.com/bitrise-io/bitrise-steplib.git
project_type: ios
meta:
  bitrise.io:
    stack: osx-xcode-16.2.x
    machine_type_id: g2-m1.4core
app:
  envs:
  - BITRISE_SCHEME: BullsEye
  - BITRISE_PROJECT_PATH: BullsEye.xcworkspace
pipelines:
  build_and_run_tests:
    workflows:
      xcode_build_for_test: {}
      run_ui_tests:
        depends_on:
        - xcode_build_for_test
      run_unit_tests:
        depends_on:
        - xcode_build_for_test
      merge_and_deploy_test_results:
        depends_on:
        - run_ui_tests
        - run_unit_tests
workflows:
  xcode_build_for_test:
    steps:
    - activate-ssh-key@4: {}
    - git-clone@8: {}
    - xcode-build-for-test@3:
        inputs:
        - destination: generic/platform=iOS Simulator
    - share-pipeline-variable@1: {}
    - deploy-to-bitrise-io@2: {}
  run_ui_tests:
    steps:
    - pull-intermediate-files@1: {}
    - xcode-test-without-building@0:
        inputs:
        - xctestrun: "$BITRISE_TEST_BUNDLE_PATH/BullsEye_UITests_iphonesimulator18.2-arm64-x86_64.xctestrun"
        - destination: platform=iOS Simulator,name=iPhone 12 Pro Max
    - deploy-to-bitrise-io@2: {}
  run_unit_tests:
    steps:
    - pull-intermediate-files@1: {}
    - xcode-test-without-building@0:
        inputs:
        - xctestrun: "$BITRISE_TEST_BUNDLE_PATH/BullsEye_UnitTests_iphonesimulator18.2-arm64-x86_64.xctestrun"
        - destination: platform=iOS Simulator,name=iPhone 12 Pro Max
    - deploy-to-bitrise-io@2: {}
  merge_and_deploy_test_results:
    steps:
    - pull-intermediate-files@1: {}
    - script@1:
        inputs:
        - content: |
            #!/usr/bin/env bash
            set -eo pipefail

            for item in "${BITRISE_UI_TEST_XCRESULT_PATH}" "${BITRISE_UNIT_TEST_XCRESULT_PATH}";
              do
                echo "Exporting ${item}"

                test_name=$(basename "$item" .xcresult)
                echo "Test name: $test_name"

                test_dir="${BITRISE_TEST_RESULT_DIR}/${test_name}"
                mkdir -p "${test_dir}"
                echo "Moving test result to: ${test_dir}"
                cp -R "${item}" "${test_dir}/$(basename ${item})"

                test_info="${test_dir}/test-info.json"
                echo "Creating Test info at: ${test_info}"
                echo "{ \"test-name\": \"${test_name}\" }" > "$test_info"
              done
    - deploy-to-bitrise-io@2: {}
In the above example, we started by defining the Pipelines attribute, we have a Pipeline called build_and_run_tests, with four Workflows that depends on each other. This means that if xcode_build_for_test finishes successfully, the run_ui_tests and the run_unit_tests starts parallel. If any of the Workflows fail, the subsequent Workflow will not start: instead, the Pipelines will be aborted and marked as failed.
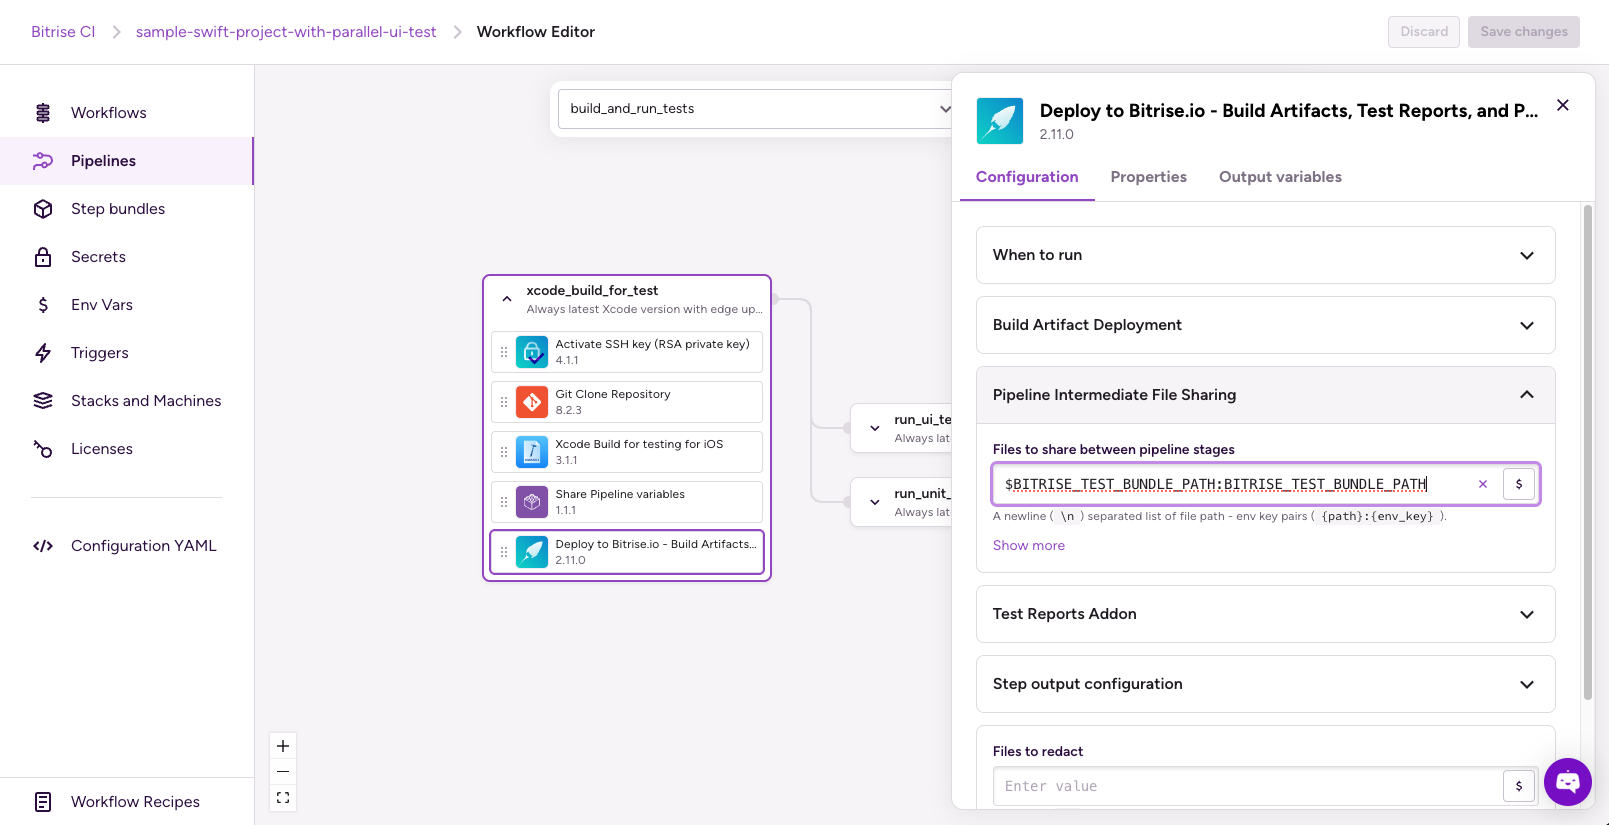
Specifying files to share between Workflows
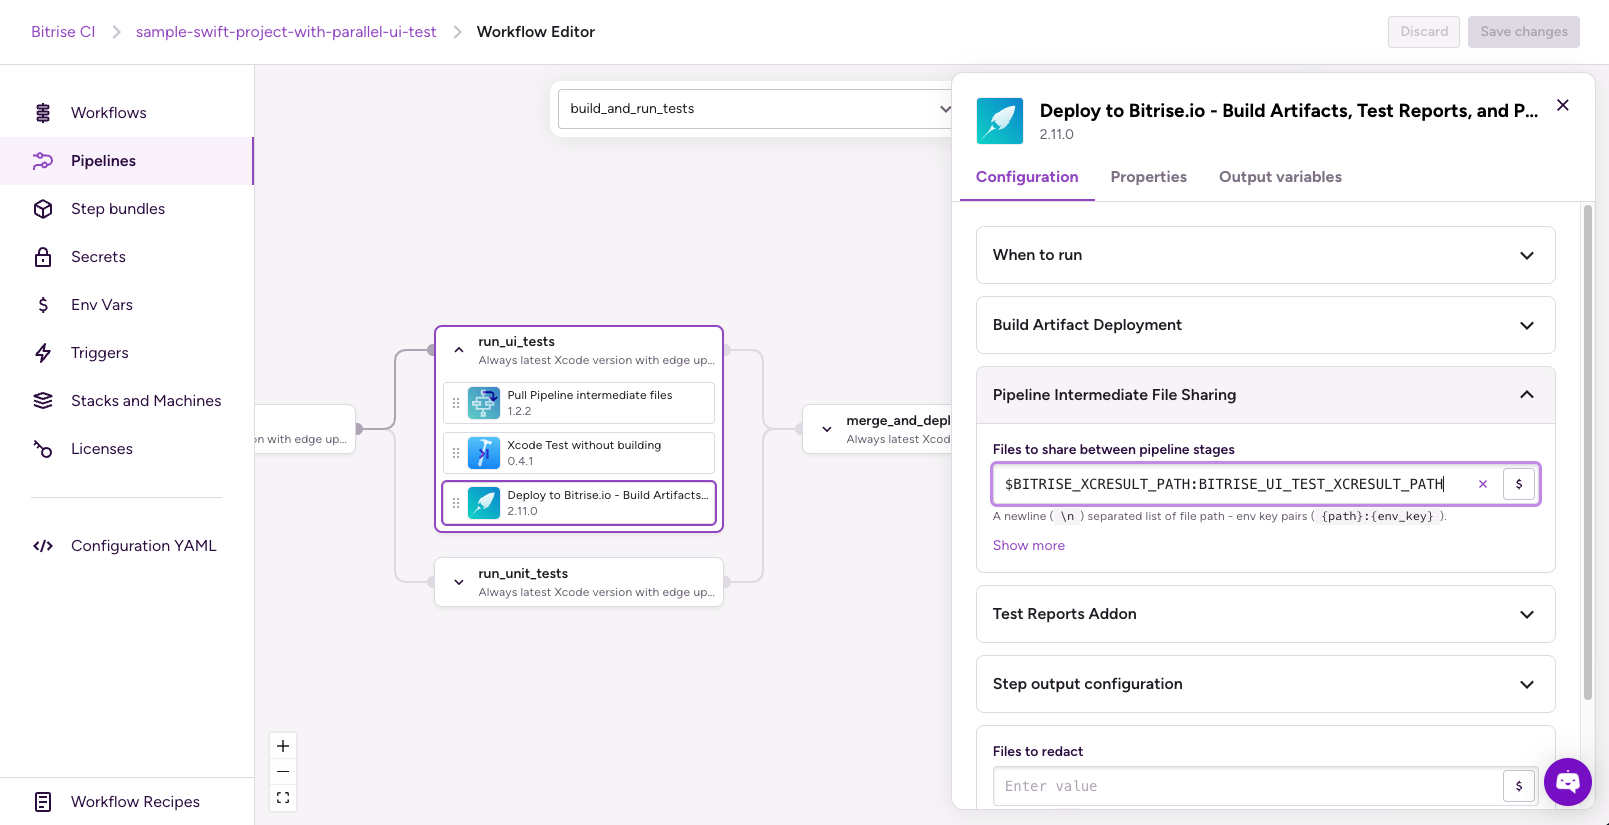
Add the Deploy to Bitrise.io - Build Artifacts, Test Reports and Pipeline Intermediate Files Step to the Workflow (typically to the end of the Workflow) to generates a build artifact.
Then, configure the Step’s Files to share between pipeline stages input under the Pipeline Intermediate File Sharing category. In our example, we used it in the xcode_build_for_test Workflow to share the Test Bundle Path with the run_ui_tests and run_unit_tests Workflows to be able to run the tests without the need to build the app again.
workflows:
  # ...
  xcode_build_for_test:
    steps:
    # ...
    - deploy-to-bitrise-io@2:
        inputs:
        - pipeline_intermediate_files: "$BITRISE_TEST_BUNDLE_PATH:BITRISE_TEST_BUNDLE_PATH"
And it can also be used in the run_ui_tests and run_unit_tests Workflows to share the test results with the merge_and_deploy_test_results Workflow
workflows:
  # ...
  run_ui_tests:
    # ...
    steps:
    # ...
    - deploy-to-bitrise-io@2:
        inputs:
        - pipeline_intermediate_files: "$BITRISE_XCRESULT_PATH:BITRISE_UI_TEST_XCRESULT_PATH"
  run_unit_tests:
    # ...
    steps:
    # ...
    - deploy-to-bitrise-io@2:
        inputs:
        - pipeline_intermediate_files: "$BITRISE_XCRESULT_PATH:BITRISE_UNIT_TEST_XCRESULT_PATH"
Using artifacts from different Workflows in a Pipeline
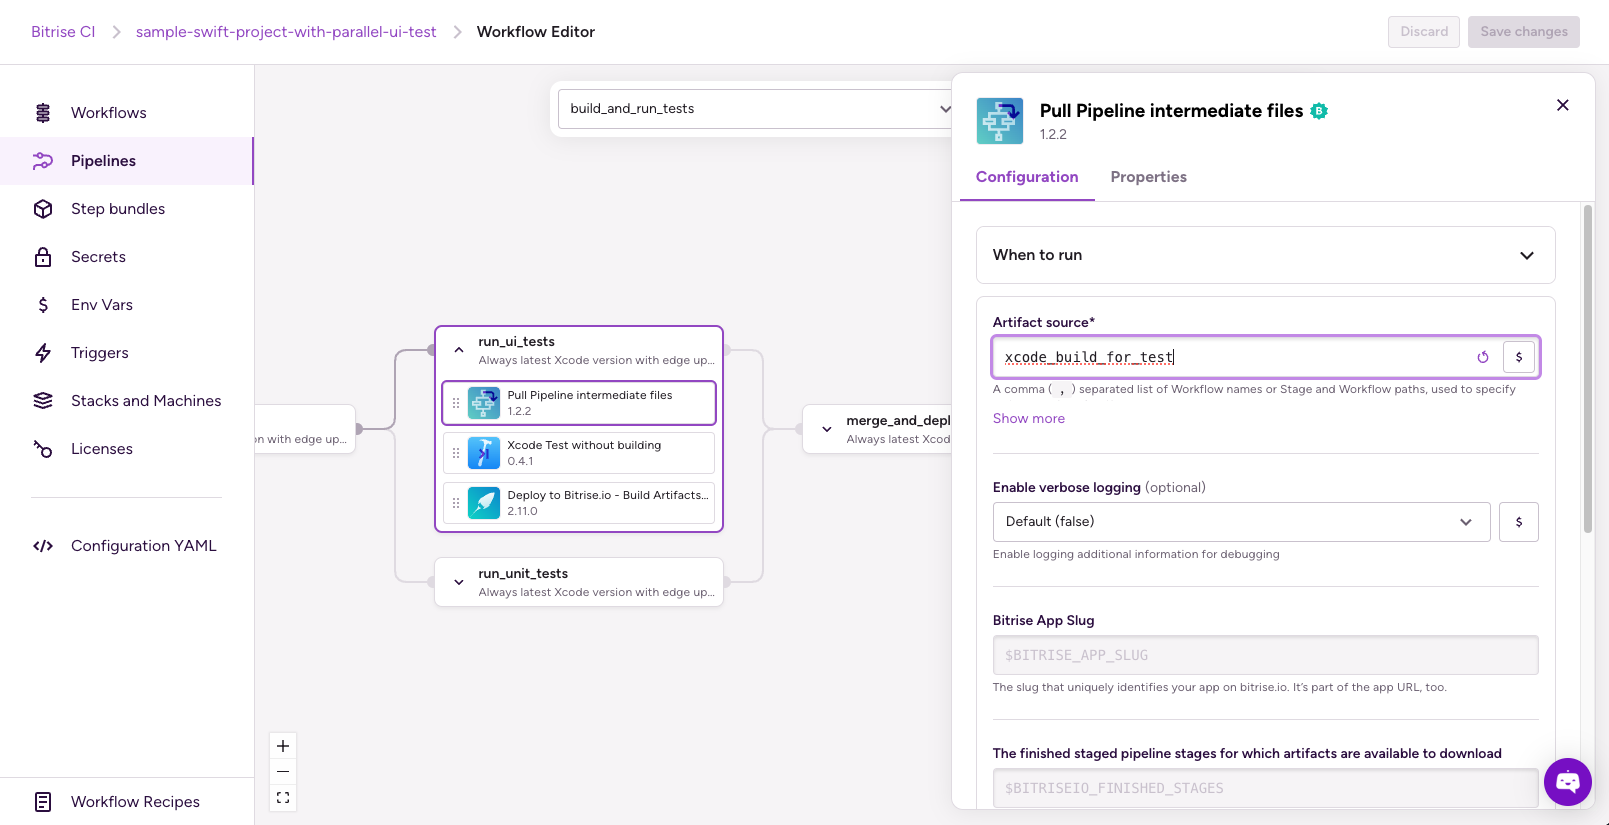
You might have Workflows that rely on artifacts generated by previous Workflows, such as the run_ui_tests and run_unit_tests Workflows; they rely on xcode_build_for_test Workflow. To use them during your subsequent Workflows, you can use the Pull Pipelines intermediate files Step.
Configuring a Workflow to always run
You can mark a Workflow to make sure it runs even if a Workflow it depends on failed. To do this, simply set the should_always_run attribute of the Workflow to workflow either in the graphical interface of the Workflow Editor or in the YAML (.yml) file:

pipelines:
  build_and_run_tests:
    workflows:
      # ...
      merge_and_deploy_test_results:
        should_always_run: workflow
        # ...
Aborting the Pipeline on Workflow failure
By default, if a Workflow fails the Pipeline will continue. However, you can configure the Pipeline to immediately terminate when any given Workflow fails by setting the abort_on_fail attribute ("Abort Pipeline on failure" toggle in the UI) to true either in the Workflow Editor or in the YAML (.yml) file:

pipelines:
  build_and_run_tests:
    workflows:
      # ...
      run_ui_tests:
        abort_on_fail: true
        # ...
      run_unit_tests:
        abort_on_fail: true
      # ...
Sharing Env Vars between Pipelines Workflows
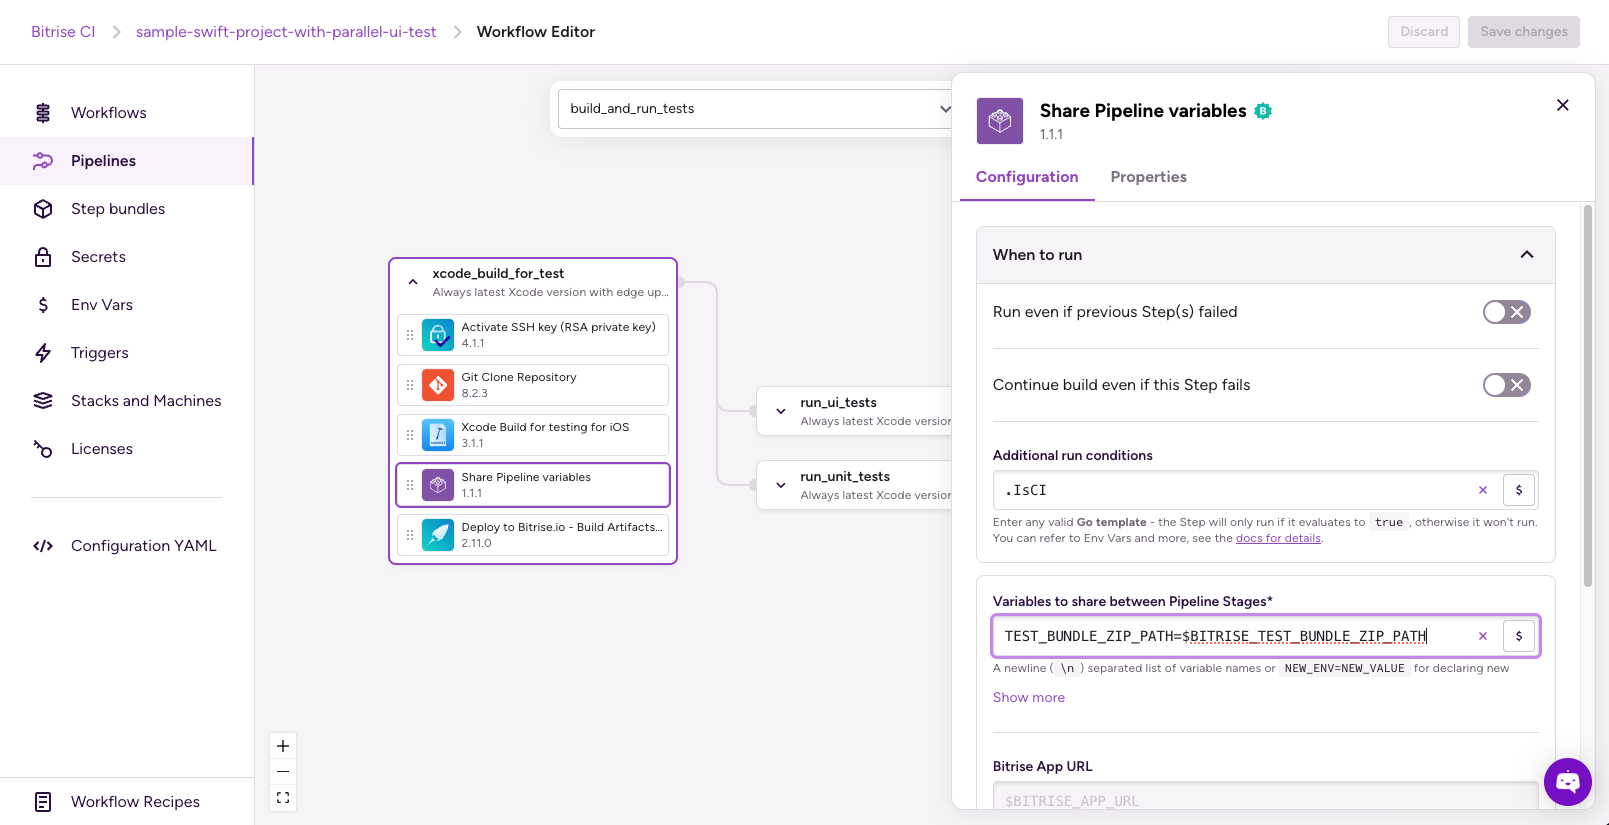
You can reuse any environment variable from a Workflow and reuse it in subsequent Workflows using the Share Pipelines variables Step with the following steps:
- Add the Share Pipelines variables Step to the Workflow.

- Optionally, you can define additional run conditions in the Additional run conditions input. The Step will only run if the conditions you specify here are true.
- Add the Env Var(s) you would like to use in subsequent Workflows in the Variables to share input. For example, you can share the Test Bundle Zip Path between the Workflows or other environment variables.
Additionally, you can combine the Share Pipelines variables Step with run_if expressions to create Pipelines with optional Workflows.
Setting up run_if conditions for optional Workflows using Pipelines
Optional Workflow is a Pipelines feature that allows you to decide whether a Workflow should run based on conditions you set in a run_if expression.
In bitrise.yml, under the pipelines/workflows field, you can add a run_if expression to any Workflow, and if they are part of a Pipelines build, the run_if will be evaluated to determine if the Workflow should run or not.
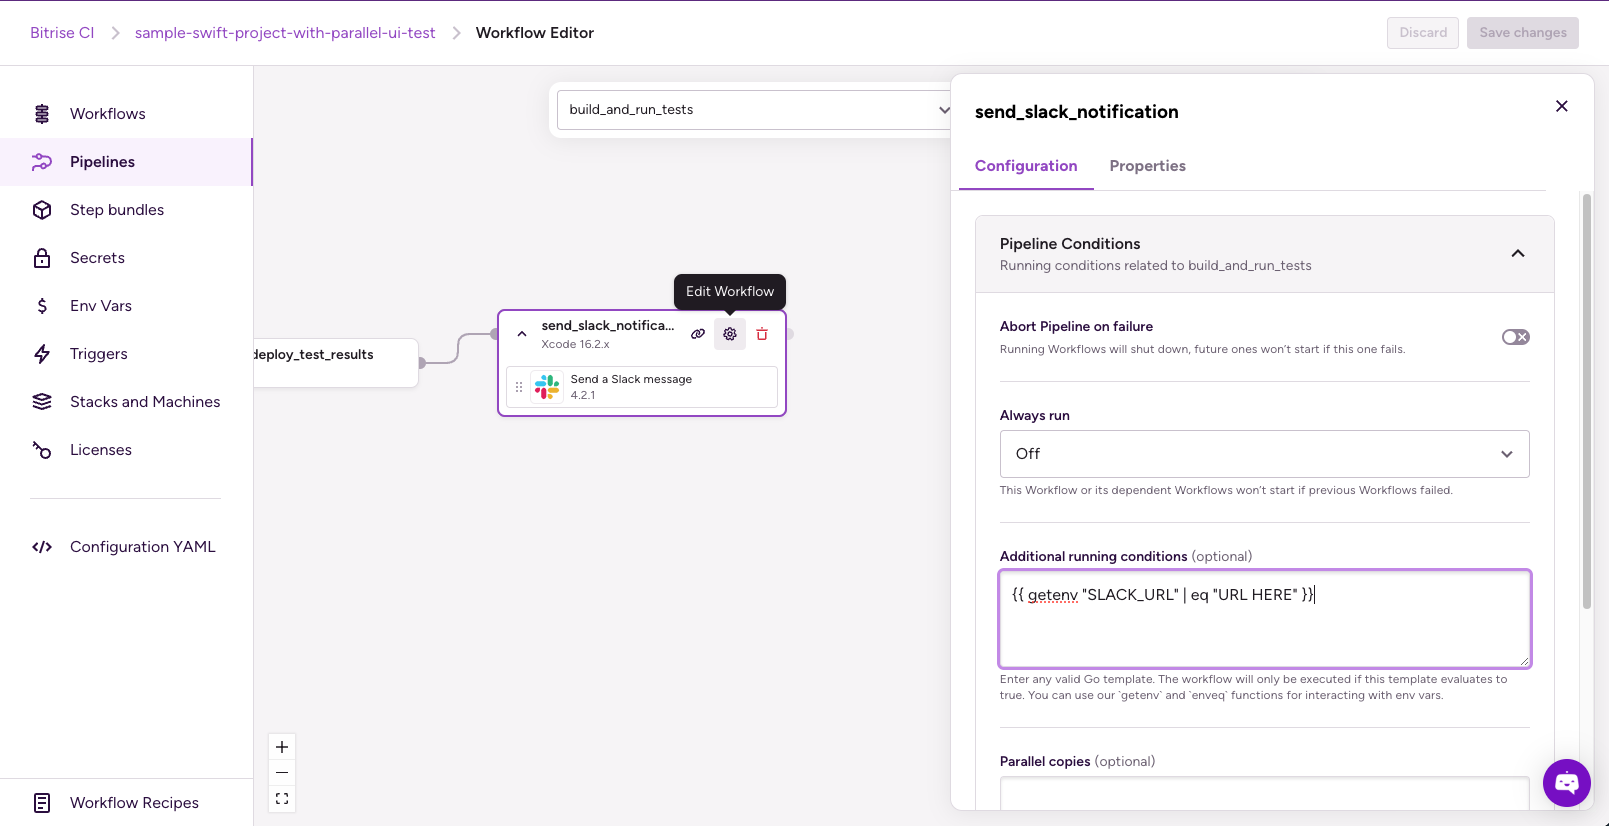
For example, we can add another workflow to send Slack notifications after all the Workflows are finished. In the bitrise.yml file we can add the run_if with the workflow like the following example:
pipelines:
  build_and_run_tests:
    workflows:
      # ...
      send_slack_notification:
        run_if:
          expression: '{{ getenv "SLACK_URL" | eq "URL HERE" }}'
        depends_on:
        - merge_and_deploy_test_results
workflows:
  # ...
  send_slack_notification:
    steps:
    - slack@4: {}
In case the SLACK_URL is wrong or there is any issue with it, the send_slack_notification Workflow will be skipped as shown below.

TIP: A run_if can be any valid Go template, as long as it evaluates to true or false (or any of the String representations, for example, True, t, yes, or y, are all considered to be true). If the template evaluates to true, the Workflow will run; otherwise, it won’t.
After these changes, the bitrise.yml file will look like this:
---
format_version: '13'
default_step_lib_source: https://github.com/bitrise-io/bitrise-steplib.git
project_type: ios
meta:
  bitrise.io:
    stack: osx-xcode-16.2.x
    machine_type_id: g2-m1.4core
app:
  envs:
  - BITRISE_SCHEME: BullsEye
  - BITRISE_PROJECT_PATH: BullsEye.xcworkspace
pipelines:
  build_and_run_tests:
    workflows:
      xcode_build_for_test: {}
      run_ui_tests:
        depends_on:
        - xcode_build_for_test
        abort_on_fail: true
      run_unit_tests:
        depends_on:
        - xcode_build_for_test
        abort_on_fail: true
      merge_and_deploy_test_results:
        depends_on:
        - run_ui_tests
        - run_unit_tests
        should_always_run: workflow
      send_slack_notification:
        run_if:
          expression: '{{ getenv "SLACK_URL" | eq "URL HERE" }}'
        depends_on:
        - merge_and_deploy_test_results
workflows:
  xcode_build_for_test:
    steps:
    - activate-ssh-key@4: {}
    - git-clone@8: {}
    - xcode-build-for-test@3:
        inputs:
        - destination: generic/platform=iOS Simulator
    - script:
        inputs:
        - content: |-
            #!/usr/bin/env bash
            # fail if any commands fails
            set -e
            # make pipelines' return status equal the last command to exit with a non-zero status, or zero if all commands exit successfully
            set -o pipefail
            # debug log
            set -x

            # write your script here
            tree $BITRISE_TEST_BUNDLE_PATH
    - share-pipeline-variable@1:
        inputs:
        - variables: TEST_BUNDLE_ZIP_PATH=$BITRISE_TEST_BUNDLE_ZIP_PATH
        run_if: ".IsCI"
    - deploy-to-bitrise-io@2:
        inputs:
        - pipeline_intermediate_files: "$BITRISE_TEST_BUNDLE_PATH:BITRISE_TEST_BUNDLE_PATH"
  run_ui_tests:
    steps:
    - pull-intermediate-files@1:
        inputs:
        - artifact_sources: xcode_build_for_test
    - xcode-test-without-building@0:
        inputs:
        - xctestrun: "$BITRISE_TEST_BUNDLE_PATH/BullsEye_UITests_iphonesimulator18.2-arm64-x86_64.xctestrun"
        - destination: platform=iOS Simulator,name=iPhone 12 Pro Max
    - deploy-to-bitrise-io@2:
        inputs:
        - pipeline_intermediate_files: "$BITRISE_XCRESULT_PATH:BITRISE_UI_TEST_XCRESULT_PATH"
  run_unit_tests:
    steps:
    - pull-intermediate-files@1:
        inputs:
        - artifact_sources: xcode_build_for_test
    - xcode-test-without-building@0:
        inputs:
        - xctestrun: "$BITRISE_TEST_BUNDLE_PATH/BullsEye_UnitTests_iphonesimulator18.2-arm64-x86_64.xctestrun"
        - destination: platform=iOS Simulator,name=iPhone 12 Pro Max
    - deploy-to-bitrise-io@2:
        inputs:
        - pipeline_intermediate_files: "$BITRISE_XCRESULT_PATH:BITRISE_UNIT_TEST_XCRESULT_PATH"
  merge_and_deploy_test_results:
    steps:
    - pull-intermediate-files@1: {}
    - script@1:
        inputs:
        - content: |
            #!/usr/bin/env bash
            set -eo pipefail

            for item in "${BITRISE_UI_TEST_XCRESULT_PATH}" "${BITRISE_UNIT_TEST_XCRESULT_PATH}";
              do
                echo "Exporting ${item}"

                test_name=$(basename "$item" .xcresult)
                echo "Test name: $test_name"

                test_dir="${BITRISE_TEST_RESULT_DIR}/${test_name}"
                mkdir -p "${test_dir}"
                echo "Moving test result to: ${test_dir}"
                cp -R "${item}" "${test_dir}/$(basename ${item})"

                test_info="${test_dir}/test-info.json"
                echo "Creating Test info at: ${test_info}"
                echo "{ \"test-name\": \"${test_name}\" }" > "$test_info"
              done
    - deploy-to-bitrise-io@2: {}
  send_slack_notification:
    steps:
    - slack@4: {}
Now that we discussed the extensive capabilities of Pipelines, it's time to run one!
Running a Pipeline
There are two ways to start a Pipeline:
- Trigger a Pipeline automatically
- Trigger a Pipeline manually
In detail, let’s explain how we can run a Pipeline with these options.
Triggering a Pipeline automatically
To set up automatic build triggers, you need to setup a trigger for the Pipeline. The trigger defines what code events should trigger builds. In a Pipelines configuration, you need to specify the Pipelines triggered by certain code events, such as pushes, pull requests, and tags.
In the bitrise.yml file, it can be like this example:
pipelines:
  build_and_run_tests:
    # ...
    triggers:
      pull_request:
      - source_branch: "*"
That means we will run the Pipeline on every branch pull request.
This example focuses on configuring Pipelines triggers using bitrise.yml, the same configuration can be achieved from the Workflow Editor's Triggers tab on the Pipeline config.

Triggering a Pipeline manually
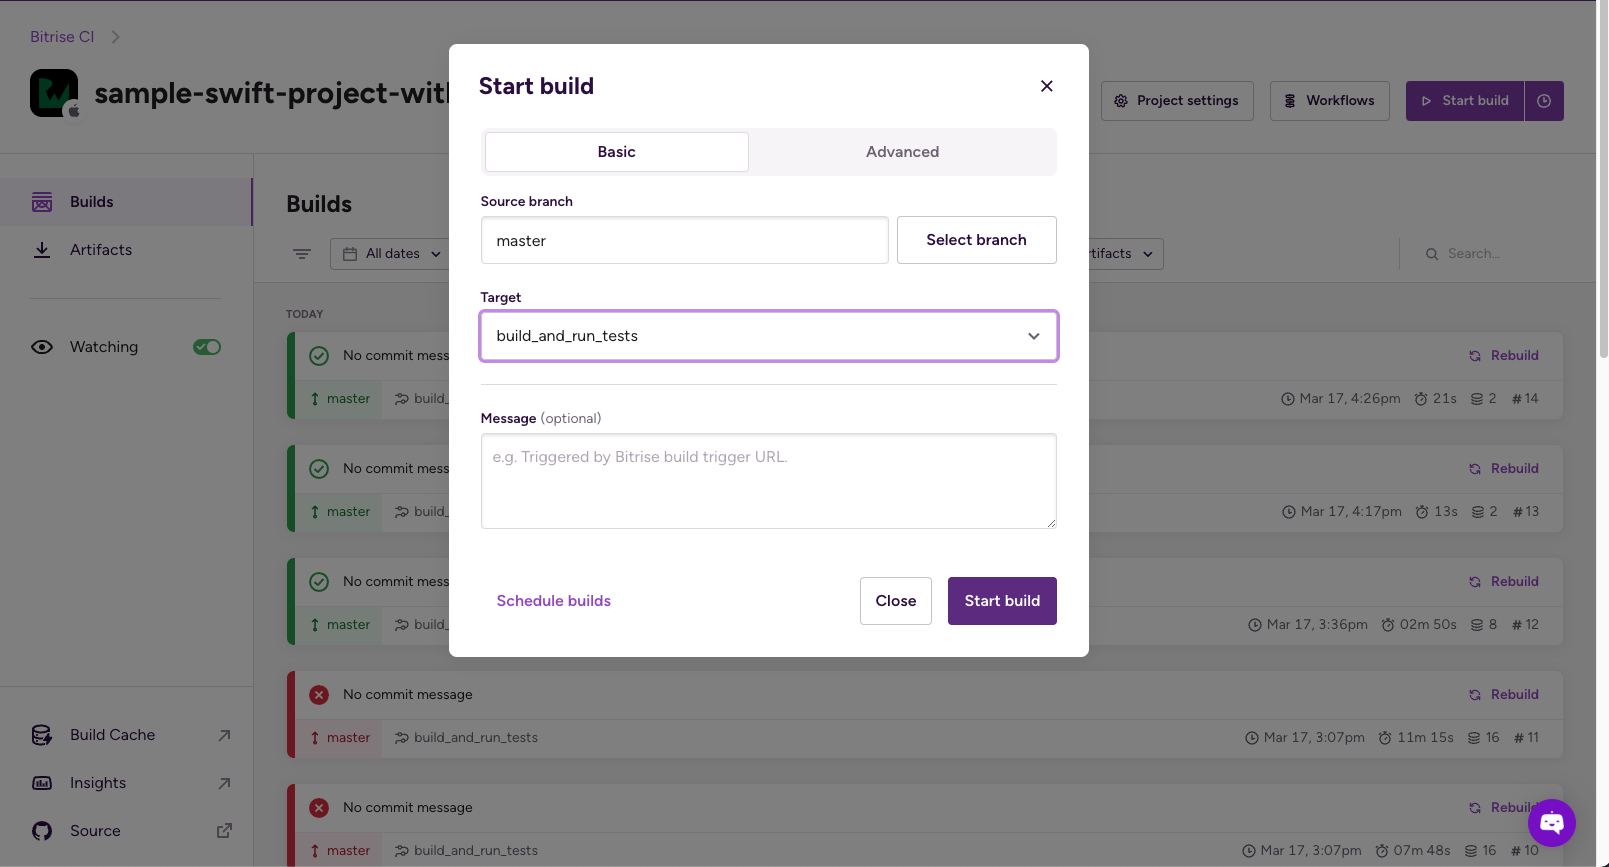
To trigger the Pipelines manually, you can follow the following steps:
- Open the app on Bitrise.
- Go to the Builds tab.
- Click Start/Schedule a Build.
- Scroll down to the Target menu.
- Select the Pipeline you want to run.
- Click Start build.
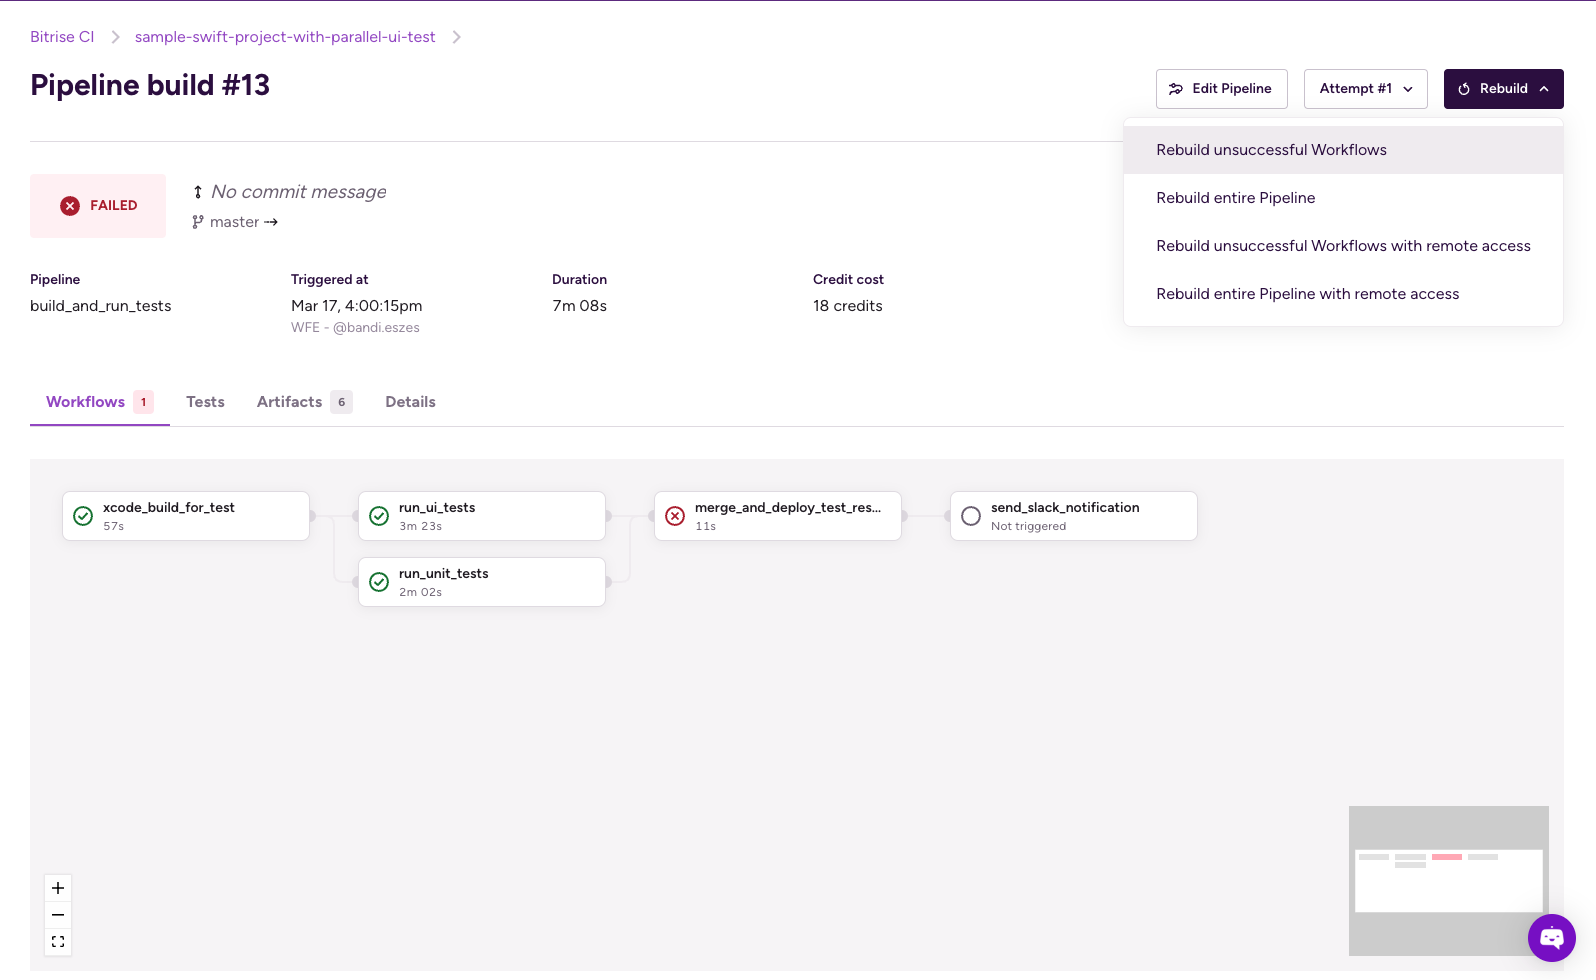
Rebuilding a Failed Pipeline
When a Pipeline build fails, you have several options:
- Rebuild the entire Pipeline
- Rebuild just the unsuccessful Workflows
- Rebuild starting from any workflow in the graph
- Rebuild the entire Pipeline with Remote access
- Rebuild unsuccessful Workflows with Remote access
Helpful Resources
Our team constantly works to build the ultimate solutions for all mobile developers to learn and share best practices. If you have any suggestions or questions, join our community forums.
We are always happy to help you.
Happy testing!